Showing posts with label Sweet Things. Show all posts

Tuesday, May 22, 2012

Berry Good!

I love it when inspiration hits.  It can come from nowhere and from there can come great things.  Like staring at my little raspberry bush, thinking about how lovely it was to have grown my own little spartan crop of sweet little berries and how nice they tasted.

Then remembering that I had quite a large bag of berries in the freezer that, while they were not fruit of my vine, were able to satiate my feelings of nostalgia for something sweet and berry-ful. 

I wanted to bake something, and I was thinking of the classic combination of white chocolate and raspberry.  You can usually find these as a muffin, though I wanted to do a riff on this and turn them into a cute little cupcake with the addition of a sweet vanilla butter cream.

The result?  Delicious.  You get the sharpness of the raspberry which cuts the sweetness of the white chocolate.  The butter cream works.  While you may think it a little overkill, it is a lip smacking addition.  There is nothing like feeling a little naughty when it comes to sweet things, so why not up the ante and smother them with frosting?

I took these to work to share for morning tea yesterday and got wonderful reviews.  (My colleagues are my most tough and honest critics).  Definitely part of my baking repertoire from now on.


Raspberry and White Chocolate Chip Cupcakes (Adapted from Best Recipes.com)

2 cups plain flour
2 tsp baking powder
3/4 cup castor sugar
2/3 cup white chocolate chips
120g melted butter, cooled slightly
1 egg
3/4 cup buttermilk
1/2 tsp vanilla extract
1 cup frozen raspberries

Preheat oven to 180C.  Line a 12 cup capacity muffin pan with cupcake liners.
Sift flour and baking powder, add sugar and choc chips.  Stir to combine.
Mix milk, melted butter, egg and vanilla and add to dry ingredients, fold gently to combine.  Add raspberries and fold through gently.  Spoon into liners to about 2/3 full and bake for 25 minutes.

Vanilla Butter cream

2 cups icing sugar
1 tbs butter
1/4 tsp vanilla extract
1 tbs milk

Sift icing sugar and add butter and mix into the sugar.  Add vanilla and milk, a little at a time, mixing until combined.  With electric beaters, beat until combined and fluffy.  The texture should be light but stiff enough to pipe or spread onto the cooled cakes - if you feel the mixture is too tight, add a little more milk and beat further, if it is too runny, sift in more icing sugar.  You can also add a few drops of food colouring to tint it if desired.

Until next time...

Kitty xx

Saturday, May 5, 2012

A New(ish) Season

Autumn is a lovely time of year here in Queensland.  Along with spring, it is my favourite season.  Autumn is when the weather is just starting to cool down as it comes into winter, and my tummy always craves things that are warm and satisfying.  Come to think of it, when does it not crave anything!


I bought some beautiful new season apples at the supermarket yesterday.  I love how they look in the bowl just as they are as a still life. 

Of course now my mind starts to race at what I could do with them.  I love the smell of apples stewing.  All that lovely aroma, laced with clove, cinnamon and nutmeg.  It is comforting and enveloping like a warm hug.  Especially on a cold rainy day. 


Stewed fruits are delicious hot or cold.  With ice cream, cream, custard or alone.  Apple is particularly nice mixed into yoghurt or muesli or on my new found favourite - Latkes (with a hearty dollop of sour cream).

Apple and Rhubarb would have to be one of my all time favourite stewed fruit combos.To stew the fruit it's basically thus: 

Cut a few ribs of rhubarb and 2 or three peeled and cored apples into chunks.  Place into a saucepan with a few tablespoons of sugar and 1/2 tsp vanilla extract (You can also add cinnamon/cloves etc here to taste).  Bring to a gentle simmer.  The fruit will yield some moisture, so you will not need to add water, but if you wish you can add a little splash of water to help the cooking process along.  If you are trying to cut down on your sugar intake, add a little apple juice in lieu of some of the sugar.  Cook for about 10 mins.  Once the fruit is fork tender, remove from the heat and clamp on a lid.  Use as desired. 

On a side note, if you are using young rhubarb it should be nice and tender.  If it is older it may be a little stringy so just run a potato peeler along the stalks to remove some of the strings.

My Dad makes a really great apple pie.  I always love his baking.  I have tried to get some recipes from him, but his recipes are more like 'a bit of this, bit of that, bung it in the oven' kind of thing.  Somehow what he does seems to work - I guess I get my baking courageousness from him.  Even if he isn't as experimental as I am with flavours and textures it is nice to know that he has had some influence!

Maybe when I'm done admiring my beautiful bowl of apples I will just eat them as is, cut them into wedges and spread them with Nutella (yum!) or bake them into a pie.  If I go out and talk nicely to my rhubarb plant there may even be a whiff of that too.

Until next time...

Kitty xx

Wednesday, May 2, 2012

Little Mouthfuls of Gorgeousness

For the past few months I have been looking for recipes that I remember eating when I was a kid.  You know, the stuff that you eat today that reminds you of what 'Grandma used to make'.  The things that make you giddy and smile to remember the simpler times, when your mouth wasn't quite big enough to cram in a whole piece of cake, or your mother was constantly dabbing away at the cream all over your fingers and face. 

Baking has had a resurgence in popularity lately, and things to me seem a little too primped and technical.  I am looking for the good old fashioned things, sponge cakes with jam and cream, pies with home made pastry and sticky gooey caramel fillings (Even if I can never bring myself to try boiling a can of condensed milk to make caramel - kids don't try this at home).  All the good stuff that we remember eating as kids, is the stuff I am yearning for today. 


As you know I am quite the fan of little individual baked treats.  Even though I love a grand layered cake at the best of times, these are easy and fun to bake, look sweet, petite and best of all, when it comes to serving you don't have to have the 'who's going to cut the cake' argument.

Jelly cakes have become my latest little love.  I used to eat these as a kid and have had a craving for them in the past few weeks.  They are these delightful little patty cakes, filled with cream and rolled in semi-set jelly and coconut.  They look so dainty and pretty.  Making them again brings back so many fond memories.

I love them piled high on a pretty plate and shared among friends.

Perfect with a lovely hot cup of tea. 


Jelly Cakes - Recipe adapted from Taste.com.au

60g butter, at room temperature
1/2 cup castor sugar
1 egg, lightly beaten
1 cup flour
1 tsp baking powder
pinch of salt
1/2 cup milk
85g packet of Port Wine jelly crystals
1 cup boiling water
1 cup cold water
3 cups dessicated coconut
1/2 cup thickened cream, whipped


Preheat oven to 180°C. Grease a 12 x 2 tablespoon capacity patty pan. (Oil spray is perfect for greasing these pans) Cream butter and sugar until light and fluffy. Add egg, a little at a time, beating until well combined.  Sift flour, baking powder and salt.  Gently fold in half the flour and half the milk. Repeat with remaining flour and milk.

Spoon about 1 tsp of the mixture into patty pan. (You may need more depending on the size of your patty pans - if you use muffin pans, use a tablespoon of mixture) Bake for 15 to 20 minutes or until a skewer inserted into the centre comes out clean. Cool cakes on a wire rack.

Cut each cake in half horizontally. Sandwich halves back together using 1 teaspoon of cream.  Place in refrigerator for 10-20 mins.  (I find this step really helps the cream to adhere the cake halves together and makes them easier to roll in jelly and coconut.  You could also freeze the cakes at this stage if you wish and jelly/coconut later).

Stir jelly and boiling water together in a bowl until crystals are dissolved. Stir in cold water. Refrigerate for 1 hour or until cold and slightly thick.

Place coconut into a large bowl.   Roll cakes, 1 cake at a time, into jelly. Gently shake off  excess jelly. Toss cakes in coconut until well coated. Place onto a lined tray and refrigerate for 30 minutes or until set.


These cakes freeze well.  Just pull out of the freezer and place on a plate for 20-30 mins to reach room temperature.  Great for when you have company coming and want to have a little special something that looks like you have slaved all morning away on!

Feel free to experiment with different jelly flavours.  I especially like Port Wine because it gives the cakes a lovely pink hue.

Until next time...

Kitty xx

Friday, March 23, 2012

Hello Sunshine!


I am so happy to see the sun.  Like you wouldn't believe.  Not only do I get my laundry done (what is it about women - at the first sign of inclement weather all we think about is how are we going to get our sheets dry).  I don't have to stay inside getting fat from all the baking and episodes of Mad Men I have been watching.

Despite all this shiny happy weather, I do have plans to cook today.  I have a hankering for French Apple Cake.  I bought some New Season Delicious Apples last week which really should be called 'Floury Disappointment Apples' because they were exactly that.  On the outside they looked stunning.  Deep red, shiny and achingly crisp (I know crisp is more a texture rather than a visual but you get the picture).  They looked like the kind of apple a Wicked Witch would offer a Fairy Princess.  And, just like in the fairy tales, one bite was all it took.  Yuk.

So I think rather than throw them away, I will try and transform them with the magic of adding , rum, sugar and heat. 

As I write you, I am sitting out in my garden enjoying my morning cup of tea and trying to stretch out my black skinny jeans.  I really need to stop kidding myself when I buy clothing.  I mean, 'skinny'... One can dream.

It is amazing what a little sunshine can do for your day.

Until next time...

Kitty xx

Saturday, March 17, 2012

A Gentle Prod...


A prod, a boost, whatever.  Yes!  Sit at the laptop and enjoy seeing the words magically appear on the screen again.

Oh how good it feels!

I have been so very busy of late, holidaying over Christmas and settling back into work for the new school year.  I even had my first attempt at catering, baking cupcakes for a Wedding!  How exciting!

I spent December and January in my adopted 'homeland', America.  Enjoying time in Los Angeles, San Francisco and Christmas and New Year in New York.  Oh bliss!  And my yearning for all things buttery, maple-ey, hot-doggery and pretzel-y will likely see my return in September this year.

But enough about my summertime antics, lets talk about the absolutely gorgeous cupcakes I made for the Wedding last month... 

Bless you Larissa Lindsay for asking me to bake the sweet morsels for your nuptials.  It indeed was a pleasure. 

Also many many many thanks to The Hummingbird Bakery.  I have no affiliation with you (or anyone in the bakery world for that matter) but it is your cookbook that provided me with the recipe for Red Velvet Cupcakes.  In my opinion, this is the best Red Velvet recipe I have ever baked and I have tried a few.  I doubled the mixture and baked it 6 times and it worked out perfect each time, producing a whopping 85 large cupcakes.


I was a little nervous to start with as I had never really 'catered' for anyone before.  I turned my nerves into confidence and made sure I had everything at hand on the day of baking.  I even did a test batch of the cupcakes for the Bride and Groom beforehand so I knew for certain that they were going to be happy.  I mean, you do want things to be perfect on your wedding day, right? 

I am happy to report there are no tales of dropped cake pans, faulty ovens, broken mix masters or tantrums.  I was super-organised and started early.  I baked all morning up until lunchtime with Def Leppard playing in the background.  I was rocking out old school and having a wonderful time. 

The following day, after coming home from work, it was time to pipe on the cream cheese frosting.

Frosting the cupcakes was a little more of a challenge.  With there being so many cupcakes and such a large quantity of cream cheese frosting, I knew I would need a little help.  I enlisted in the help of friend (and the Bride's Maid of Honour) Kellie and her beautiful 9 year old daughter, Chloe to gild each cream cheese frosted cake with gold dust as I piped on the frosting.  It was like a little production line!

I delivered the cupcakes, all 7 boxes of them to the restaurant, with my car air conditioner pumping overtime and felt the biggest sense of relief as the cakes were taken from my hands and placed into the restaurant's cold room.  Be free my little babies!

So for two days work, (including me going to my day job) a lot of love, rock music and over-heating electric hand beaters, I got the cakes baked, iced and delivered.  I even got to attend the Wedding and Reception!  I was very nervous as dessert was served, but I was worried over nothing.  The cakes were a success!  *Phew!*


The whole experience was a very positive one for me.  I really love baking.  Most of all it is lovely to hear from others that my efforts are both delicious as well as visually appealing.  Maybe if I had a bigger oven and a mixer with a little more oomph I might even consider doing this more often.  Who knows!  At this stage, my biggest aspirations are to buy a stand mixer.  I still love my dinky little hand beater, even if at times it feels and smells like it is going to blow up. 

Would I do this again?  Absolutely!  I really enjoyed the whole experience.  I truly feel that I have a calling for baking.  It is something that really does make me happy.  If I could make a living out of it and still be happy?  Well that remains to be seen.  Wish me luck anyway!


Until next time...

Kitty xx

Tuesday, August 9, 2011

Feel the Love...

I adore Dorie Greenspan's French Apple Tea Cake.  I make it often and it never disappoints.  It is my all time favourite, 'hand on my heart' cake recipe and I wonder how I ever got along in life as a home baker before I found Dorie. 

Yesterday I decided to give it a couple of tweaks -  I know it is almost blasphemous to mess with perfection, but I like experimenting and believe that if you have a fair idea of what you are doing, you can always adapt a recipe/substitute like ingredients to a degree.  I mean, isn't imitation the finest form of flattery?

Results are thus - I just want to shout from the rooftops how wonderful my new cake is.  By swapping apples for ripe pears , decreasing the original amount of rum and adding a little fresh grated nutmeg, the cake is elevated from really good to extraordinary - well in my humble opinion anyway!


Pear and Nutmeg Tea Cake (Recipe tweaked and inspired by Dorie Greenspan's French Apple Tea Cake - and borrowed from David Lebovitz.com)

Makes One 8 inch (20cm) cake

3/4 cup (110g) flour
3/4 teaspoon baking powder

pinch of salt
1/4 teaspoon freshly grated nutmeg
5 ripe pears (don't use pears that are over ripe as they won't hold their shape in the cake)
2 large eggs, at room temperature
3/4 cup (150g) caster sugar
1 teaspoon dark rum
1/2 teaspoon vanilla extract
8 tablespoons (115g) butter, salted or unsalted, melted and cooled to room temperature


Preheat the oven to 350ºF (180ºC) and adjust the oven rack to the center of the oven.
Heavily butter and line an 8 inch (20cm) spring form pan and place it on a baking sheet.
In a small bowl, sift together the flour, baking powder, nutmeg, and salt.
Peel, core and dice the pears into 1 inch chunks.
In a large bowl, beat the eggs until pale and thick (they should double in size) then beat in the sugar, then rum and vanilla. Fold in half of the flour mixture, then gently stir in half of the melted butter.
Fold in the remaining flour mixture, then the rest of the butter.
Gently fold in the pears until they well-coated with the batter and scrape them into the prepared cake pan.  
Bake the cake for 50 minute to 1 hour, or until a knife inserted into the center comes out clean. Let the cake cool for 5 minutes, then run a knife around the edge to loosen the cake from the pan and carefully remove the sides of the cake pan, making sure no pears are stuck to it.

This cake is delicious with a scoop of good quality vanilla ice cream or a lazy dollop of creme fraiche. 

Until next time,

Buon appetit!

Kitty xx

Tuesday, December 14, 2010

Homesick


8pm on a Tuesday night and I am feeling homesick for my beloved New York.  I knocked up a small batch of Pumpkin Scones with Caramel Glaze so my kitchen would fill with the sweet aromas of my favourite tea spot - Alice's Tea Cup.

My kitchen is always where I go to find my happy place.

Until next time...

Kitty xx

Friday, December 3, 2010

Fruit Mince Pies


It's Holiday Season and I love it!  I have my Christmas Tree up, my house is decorated inside and out and I am really getting into the Christmas spirit by baking.

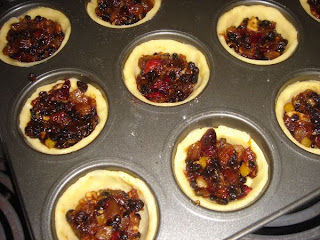
I made my Christmas cake 4 weeks ago and it is cuddled up in brown paper in the tin maturing beautifully.  With the dried fruit left over from making my cake, I made fruit mince.  

Fruit mince is a mixture of dried fruits, such as sultanas, raisins, currants - basically the fruit that is used for a fruit cake or plum pudding.  You can be flexible with the ingredients, adding whatever dried fruits you like or have on hand.  I really like the addition of dried dates as they go kind of creamy when they cook down.  I have my fruit soaking again in rum to make it plump and juicy.  I am really getting my money's worth out of this duty free rum, even if I am only baking with it!

The recipe is simple.  Remember that you can alter ingredients for the fruit mince to suit your own taste.  For instance, if you don't like mixed peel, leave it out.  Also, if you are avoiding alcohol you don't have to add rum or brandy, I like it because it adds depth of flavour to the fruit.  Just experiment!  I hope you love making them as much as I enjoy eating them!

Fruit Mince Pies (Makes about 1 dozen)

Fruit Mince
1/3 cup sultanas
1/3 cup currants
1/3 cup chopped dates
1/4 cup dried pineapple, finely chopped
1/4 cup dried cranberries
1-2 tbs mixed dried peel (you may want less according to taste)
Zest of 1 orange
1 large green apple, grated
1 tsp mixed spice
2 tbs dark brown sugar
1-2 tbs rum or brandy

Mix all ingredients together and leave in the fridge for 1-7 days to macerate. 

Sweet Shortcrust Pastry (Recipe from Taste.com.au)
1 cup plain flour
1/2 cup almond meal
1/3 cup icing sugar
125g unsalted butter, chilled
1 egg yolk

Mix flour, almond meal and icing sugar together.  Cube butter and add to flour mixing with fingertips until mixture resembles breadcrumbs.  Add egg yolk and mix until combined.  Roll into a ball and flatten slightly, wrap with cling film and rest in refrigerator for 30 mins.

Preheat oven to 180 degrees.  Roll out dough to a thickness of about 3mm.  Using a round pastry cutter (or a glass), cut circles out of the dough (about 3 inches round) and line the bottoms of a muffin pan by gently pressing the dough into the pan to about 3/4 up the sides of each cup.  (Be sure to save the scraps as you will roll out this leftover pastry to make your pie tops). 


Spoon in your fruit mince mixture (about 1 tbs should be enough to fill each tart shell).  


Roll out remaining pastry and either cut slightly smaller circles to make lids for you pies, or alteratively, use a cookie cutter to cut pastry shapes for the top of your pies.  (I find this easier as you don't have to fuss about with sealing the lids and it looks cute). 


Bake in a moderate oven for 15-20 mins or until pastry is golden.  Remove from oven and let cool in the muffin pans for 5 mins before transferring to a wire rack to cool.  A butter knife helps to ease them out of the muffin pans easily.


Dust with icing sugar before serving if desired.


I think these pies are just as good if not better than store bought.  Plus it is always nice to be able to show off and say 'I made these myself'.

Until next time...

Kitty xx 

Wednesday, November 17, 2010

Possibly the BEST cake I have EVER baked!


There are moments in life where you just have to stop and pinch yourself.  When you are in the moment and you are thinking 'Is this really happening to me?' Let me tell you, I had one of those amazing-epiphany-Oprah Winfrey 'Light Bulb Moments' on Tuesday when I baked a cake which I possibly think could change my life.

I cannot take all the credit.  I must refer you to brilliant American Blogger David Lebovitz who, incidentally does not even know I exist - even though I did comment on his blog entry regarding said cake, which goes a little like this...

 'So glad I have the day off work.  So glad I have rum and apples in pantry.  So glad I have a French Apple cake baking in my oven for afternoon tea'. 

So in the flurry of messages that this gentleman receives each time he writes a blog entry, there sits my little comment, out there in the wilderness of cyberspace.  What is amusing to me is at the time I didn't even know how really good this cake was going to be - let alone if it would work for me.

I get excited when I read about people who love food.  It gets my juices flowing to read how they, just like me, get excited about food.  Food has so many elements, other than just being 'stuff to eat'.  I love the wit and charm that food can have.  Food is a great conversation starter.  It is comforting, it is playful, it is sexy, it is nurturing.  What is there not to love?

So reading David's entry for French Apple cake (which incidentally is a Dorie Greenspan recipe), I could not help but be inspired.  I was excited because this cake looks (and is) so simple to bake.  Plus I had all of the ingredients on hand.  At first I thought it would turn out to be a little crumbly, or maybe a little rubbery - as I have had attempts at making apple cakes before without success. 


I am impatient.  I will start a recipe with only having read the ingredients list first - naughty I know!  I felt a little trepidation as I read through the method.  To me this recipe had a 'sponge cake' feel about it.  I get nervous when it comes to beating eggs - It's the whole 'not knocking the air out of them' when you add flour and melted butter.  My last sponge cake was anything but - more like a giant over sized crispy sugar cookie!  I decided I just needed to take a deep breath and what will be will be!  


I prepared my batter as per instructions and folded in my beautifully crisp Granny Smith apple pieces, being careful to not knock the air out of my batter.  I then poured it gently into my greased cake pan.  (Which I did not line with parchment - word of warning, if you attempt this cake it is a good idea to grease and line your springform tin, otherwise your cake will end up being a little more 'rustic' than you might appreciate). 


To add insult to injury, silly me had put the base of my springform tin in upside down and I am sure you can imagine my horror as I saw the batter slowly seeping out of the sides of the tin... 

I took another deep breath and said to myself 'Keep calm and carry on'.  I blessed myself, I blessed the cake and I blessed the oven .  It was all in the lap of the Gods - If this cake was going to succeed there wasn't anything more I could do for it.  Of course I could have scraped it out of the tin and put it into another pan, but hey, I love a little drama!

After almost an hour my cake was baked.  The sweet aroma of apple spiked with rum filled the kitchen.  The cake was golden and looked delicious.  I left it to cool and here I discovered my lack of lining dilemma - I overcame it brilliantly.  The upshot was that the little skim of cake stuck to the bottom of the pan, became a treat for the cook!  The downside was that it made the cake look a little more like a Bulldog than a Ballerina - but you know, that is why God invented icing sugar!  (Flipping it helps disguise blemishes as well).


The taste - My my my!  How do I describe it... It is spongy, with lovely chunks of apple,  with a lovely warm glow from the flavour of the rum.  Even though the alcohol is cooked out, you can't help but feel a little naughty. (I'm amused how people always get slap happy about things that have alcohol in them).

This cake is quite the dark horse - from its exterior you kind of write it off as being nothing too special - but then you taste it... 


Do try this cake.  It is simply amazing.  I must thank David and Dorie for bringing it into my life.  I hope you will one day thank them too.  By the way, here is the link for the recipe!  French Apple Cake

Until next time...

Kitty xx

Monday, November 15, 2010

Christmas Baking


When did I suddenly become a baker?  I started this blog earlier this year talking about the trepidation I felt about baking, and now... it seems to be what gets my juices flowing!

I am really excited about Christmas this year.  Mainly because I am spending it in Australia (even though I enjoyed a truly wonderful American Thanksgiving/Christmas experience last year), and because I am making the Christmas cake! 

Last week I bought an insane amount of dried fruit to make this cake- which set me back $30.  It kind of stung that all the ingredients for just the fruit component of the cake cost that much, along with the fact that I ended up with little piddly bits left over from the quantity my recipe called for. (which now makes me think... fruit pies... hmmm, maybe this excess fruit situation isn't such a bad thing).

My Mum and Dad had come to visit and brought my two cute, boisterous little Nephews along who are so full of energy (and that age where they still love their Aunt Teddy Bear) and rather than plonk them in front of the Playstation, I decided it would be nice for them to help with the fruit cake.  I got them to help measure out the quantities of the fruit, to cut up the dates and pineapple into smaller pieces, to add the rum and to each give the fruit mixture a good stir.  They were fascinated with all the different types of dried fruit that went into the cake and I let them taste each one as they added them to the mix.  Thankfully the confronting strong smell of rum was enough put them off tasting the fruit once it was mixed in.  

It was nice to see the boys excited about cooking.  I don't think you can ever be too young to learn about food.  I hope I have given them a nice memory.

Since then, my fruit has been soaking for a week in the refrigerator, with the occasional stir every other day.  The recipe only called for 2 days soaking, but I know that when my Mum has made cakes and puddings in the past, the fruit has had at least a week (if not more) worth of macerating.  I think it is what gives the cake a wonderful depth of flavour when the fruit is allowed to 'mature'.

Once I get cracking, I have 3 hours where it is just me and the oven...

The preparation is simple - even easier than a stock standard cake recipe and the kitchen fills with the wonderful aromas of Christmas!  Now all I need do is wait as it bakes...

In the end, it was almost 4 hours until my cake had baked.  I took it out of the oven and anointed it with two more tablespoons of rum, then left it to cool.

Once the cake was cool I covered it with brown paper and sealed it up in my enamel cake tin.  From now it has 6 weeks to do it's thing - become even more delicious!

I have to resist all temptation - I really want to sample a slice.  I might just have to bake another small cake so I know what I have to look forward to!

Christmas Cake - Recipe inspired / adapted from Taste.com.au

3 cups sultanas
1 1/2 cups raisins
1 cup currants
1 cup pitted dates, chopped
100g red glace cherries
1/2 cup dried cranberries 
1/2 cup dried pineapple, chopped
1/4 cup mixed peel
1/2 cup slivered almonds
1/2 cup macadamia nuts, roughly chopped
3/4 cup rum
grated rind of 1 orange
Melted butter, to grease
250g butter, at room temperature
1 cup, firmly packed dark brown sugar
4 eggs
2 cups plain flour
2 tsp mixed spice
Blanched almonds, to decorate
2 tbs rum, extra

In a large bowl, combine sultanas, raisins, currants, dates, cherries, dried cranberries, pineapple, mixed peel, rum and orange.  Cover with plastic wrap and refrigerate, stirring occasionally, for 1 week to macerate. 

Preheat oven to 150°C. Grease a round 22cm (base measurement) cake pan with melted butter.  Line the base and side with a layer of brown paper.


Beat butter and sugar in a bowl until pale and creamy. Add eggs, 1 at a time, beating well between each addition.  Add fruit mixture to butter mixture and stir to combine. Sift in flour and mixed spice and stir until well combined.  Add nuts and stir until combined.  


If you are lucky enough to have family or loved ones nearby, it is always nice to let them give the cake a stir for good luck.  Spoon into prepared cake pan and smooth the surface. Give the pan a light tap on benchtop to release any air bubbles.  Arrange almonds in a series of circular patterns on top of the cake.


Bake in oven, for 3 hours 40 minutes to 4 hours or until a skewer inserted into centre comes out clean. Drizzle hot cake with extra rum. Set aside to cool in tin before turning out.

This cake can be baked up to 3 months ahead. Cover with brown paper and store in an airtight container in a cool, dark place.


Until next time...

Kitty xx

Sunday, November 7, 2010

Sunday Sweet Thing


Sunday is a great day for baking.  It is a great distraction to keep me out of the department stores too.  Even while I was away on holiday I baked and loved being in the kitchen.  It truly is my 'Happy Place'.

Sometimes you just want something that is sweet and uncomplicated.  For me its Date and Walnut loaf.  You have to love a recipe that involves no creaming of butter and sugar!  You do have to 'cook' the dates beforehand, though this shouldn't be a problem, you can sit and flick through a magazine with a cup of tea, put the washing on or do whatever you 'never find time for' while you wait for the mixture to cool.


I decided to develop my own recipe - touching on the things that I feel go well with dates - orange, cinnamon, and pistachio.  I have given my date loaf a Middle Eastern flavour with the addition of these ingredients, as well as some ground ginger for earthy spice.


Persian Date Loaf

1 1/2 cups pitted dried dates
1 1/4 cups water
1/2 cup dark brown sugar firmly packed
100g butter
2 cups plain flour
2 tsp baking powder
1 tsp cinnamon
1 tsp ground ginger
2 eggs, lightly beaten
pinch salt
80g raw pistachio nuts
Zest of 1 orange

Preheat oven to 180C.  Grease and line a loaf pan.  Place dates, water, brown sugar and butter into a saucepan and bring to the boil.  Simmer for 2 minutes.  Remove from heat and add orange zest.  Set aside until completely cool.  When cool beat in eggs.

Sift flour, baking powder, spices and salt together.  Pour date mixture into flour and fold until evenly combined.  Fold in pistachio nuts. 

Spoon mixture into prepared loaf pan.  Bake in preheated oven for 55-60 minutes or until a skewer inserted comes out clean.  Remove from oven and let sit in the tin for 5 mins.  Turn out onto a wire rack and allow to cool completely.

This is a very moorish cake, with a dense texture and a nice zesty orange background flavour.  Enjoy as is, or with a smear of butter, or a dollop of natural yoghurt.  Belly dancing is optional, but encouraged.

Until next time...

Kitty xx

Tuesday, November 2, 2010

Yes, I do give a Whoop!


Whoopie pies - Have I been living under a rock?  Do I need to get out more?  Whilst in the States I watched quite a bit of Food Network.  I keep hearing 'Whoopie Pies' and want to know, what are these things that sound like a Bronx cheer?

Today, to satisfy my curiosity I did a little online research.  I found that these sweet lil' treats are traditional to Pennsylvanian Dutch culture and are about to have a resurgence and possibly be BIGGER than CUPCAKES! (I didn't even know they existed up until about 3 weeks ago)...

As you would know by now, I am currently having a deep and meaningful love affair with cupcakes.  Am I jumping ship by venturing into whoopie pie waters?

I need to make these to see what the fuss is about - NOW!

(First I must wait for my egg to reach room temperature...)

OK, let's bake!

These little cakes are surprisingly simple to make.  Traditionally they have a marshmallow filling - but of course I had to bastardise it and fill mine with vanilla buttercream - I didn't have marshmallows on hand and thought that the cakes could use the extra creaminess of buttercream as opposed to a gooey spreading of marshmallow, but that is just me, you do as you wish and let your own taste be your guide.

Whoopie Pies (recipe courtesy of Taste.com.au)
1 cup plain flour
1/2 cup dutch cocoa
1/2 tsp baking powder
1 1/2 tsp bicarbonate soda
120g unsalted butter, softened
100g (1/2 cup) brown sugar, firmly packed
1 egg at room temperature
1 tsp vanilla extract
1/2 cup buttermilk

Preheat oven to 180C/350F and line 2 baking sheets with parchment paper.  Sift dry ingredients together in a bowl and set aside.  Beat butter and sugar to a cream, add vanilla and egg and beat to combine.  With a wooden spoon, fold in flour and milk, alternating a third at a time until well combined.  Drop tablespoons of the mixture onto your baking sheet, making sure you leave a 2 inch gap between each, as they will spread.  Bake for between 10-15 minutes, or until springy to the touch.  Allow to cool completely on a wire rack and sandwich with vanilla buttercream.


Vanilla Buttercream
3 cups pure icing sugar
2 tbs unsalted butter
3 tbs milk
1 tsp vanilla extract
Pinch salt

With an electric mixer, beat icing sugar and butter until mixture becomes crumbly.  Add milk,vanilla and salt and beat until mixture becomes smooth.  Carefully spread on one half of your whoopie pie and sandwich with another half.  Alternatively you can use a piping bag and pipe your buttercream for a neat result.


For the purists - Marshmallow Cream
100g Marshmallow
1 tsp warm water

In a microwave proof bowl, add marshmallows and water.  Microwave on high for 20 seconds.  Stir until smooth.  Spread over half of your whoopie pie and sandwich with another half.


This recipe should give you about 9 decent sized Whoopie Pies.  A nice little Amish inspired treat, sure to make you go 'Whoopie!' when you take your first bite.

Until next time...

Kitty xx

Monday, October 4, 2010

Where have Yuzu been all my life?


Here I am in New York City.  It is my favourite place to crash.  (Yes I do enjoy how pretentious that sounds).  It is such a diverse city with so many different cultures and cuisines.  It's the city that never sleeps - and thanks to the Manhattan Diner, if you are hungry, you can always rely on them being open 24/7.  (They do a pretty good Reuben too by the way...)

New York appeals to the mindless wanderer within me.  I can walk for hours and hours, just looking at the buildings or sitting in the park, or just people watching in general.  It is a great place to watch others while you take time to smell the roses, or to catch your breath.

One of the best things about my walks is that they have lead me to many a sweet treat along the way.  What better reward for hours of walking?  Bakery treats!


So now I introduce you to my latest TriBeCa find - The Takahashi Bakery.  It is a very clean, modern and sleek establishment.  The desserts - oh so sweet!  I was marvelling over the display cabinet and trying to discreetly take pictures, while salivating wildly. I was tempted to try their pizza with lotus root, though was in the mood for something sweet.


I bought a red bean bun to go and ordered a Yuzu Tart.  I had never heard of Yuzu before.  It is an Asian citrus, much like lemon.  I have never tasted it on its own, so I can't really give you a really honest interpretation of the flavour, but let me try and describe the tart to you...


The pastry was very short and crisp.  Once I bit into the tart, I enjoyed a soft, velvety custard which was not too tangy, and not too sweet.  It was the most delicious citrus tart I have ever tasted.  I couldn't believe I had to travel half-way around the world to find pastry nirvana! 


I think what I enjoyed most was that the citrus flavour was so smooth.  It didn't have that pucker that some lemon curd desserts can give you.  There was the perfect balance - which is such a skill to be able to perfect.  This bakery had it bang on.  I can't wait to go back!

So when I am back in Australia, I know I am going to be yearning for Yuzu.

Until next time...

Kitty xx

Saturday, September 18, 2010

Sunday Breakfast - Pancakes


I love pancakes, but they can be one of those 'hit and miss' recipes for me.  I think the Gods have to be smiling on me, or the planets need to be aligned for them to be 'just right'.  Whenever I make them, I know I will end up with either a light, fluffy pancake or a thick, dense, cakey one.  I guess I need more practice.

No matter what I end up making, they still taste good.  What I like is that pancakes can be made in next to no time - while in your pajamas!  Sunday is a great day for pancakes because I always have time for breakfast (I am so naughty during the week - I never eat breakfast!).  So I like to make them special and treat myself by serving them will all sorts of good things...

Pancakes - My simple (evolving) recipe
1 cup plain flour
pinch salt
1tbs sugar
1tsp baking powder
1 cup milk
1 egg

Put dry ingredients into a bowl.  Add milk and egg and whisk to combine and break up the lumps.  The batter should be about the consistency of pouring cream (or just a tad thicker).  Let the batter sit for 30 mins (or even overnight in the fridge if possible).

Grease a non-stick frypan with a little butter (I like to wipe it with paper towel to remove any excess that may burn in the pan) and have your pan moderately hot.  Ladle in about 1/4 cup of batter and swirl your pan to spread it out to your desired size/shape/thickness.  Watch the surface of your pancake, when the bubbles rise to the surface of the batter, it is ready to flip.  Cook on the flip side for about a minute.  (You will get a feel for how long they need to cook for).


I love my pancakes with fruit, so here are two of my favourite sweet additions. 

Berry Compote
This is so simple.  Take a few berries - here I have used strawberries, frozen raspberries and frozen blueberries and put into a bowl. 


Sprinkle over 1 tbs of sugar and a few drops of vanilla extract.  Place bowl in microwave and cook for 1-2 minutes.  The berries will collapse and release their juices and the sugar sweetens the syrup.  The longer you cook the syrup the more it will reduce and the pectin in the fruit will help create a 'jam' like consistency. 


Caramel-Maple Bananas
Heat a non-stick frypan and add 1 tbs of butter.  Add 1 sliced banana and cook until the banana takes on a little colour and softens slightly.  Add 1 tbs of Maple Syrup.  The syrup will mix with the butter to caramelise and to give the bananas a lovely glaze.


Either of the above accompaniments go equally well with French Toast or Waffles.  Or even on top of ice-cream...


Enjoy and Happy Sunday!

Until next time...

Kitty xx