Showing posts with label Quick and Easy. Show all posts

Tuesday, May 22, 2012

Berry Good!

I love it when inspiration hits.  It can come from nowhere and from there can come great things.  Like staring at my little raspberry bush, thinking about how lovely it was to have grown my own little spartan crop of sweet little berries and how nice they tasted.

Then remembering that I had quite a large bag of berries in the freezer that, while they were not fruit of my vine, were able to satiate my feelings of nostalgia for something sweet and berry-ful. 

I wanted to bake something, and I was thinking of the classic combination of white chocolate and raspberry.  You can usually find these as a muffin, though I wanted to do a riff on this and turn them into a cute little cupcake with the addition of a sweet vanilla butter cream.

The result?  Delicious.  You get the sharpness of the raspberry which cuts the sweetness of the white chocolate.  The butter cream works.  While you may think it a little overkill, it is a lip smacking addition.  There is nothing like feeling a little naughty when it comes to sweet things, so why not up the ante and smother them with frosting?

I took these to work to share for morning tea yesterday and got wonderful reviews.  (My colleagues are my most tough and honest critics).  Definitely part of my baking repertoire from now on.


Raspberry and White Chocolate Chip Cupcakes (Adapted from Best Recipes.com)

2 cups plain flour
2 tsp baking powder
3/4 cup castor sugar
2/3 cup white chocolate chips
120g melted butter, cooled slightly
1 egg
3/4 cup buttermilk
1/2 tsp vanilla extract
1 cup frozen raspberries

Preheat oven to 180C.  Line a 12 cup capacity muffin pan with cupcake liners.
Sift flour and baking powder, add sugar and choc chips.  Stir to combine.
Mix milk, melted butter, egg and vanilla and add to dry ingredients, fold gently to combine.  Add raspberries and fold through gently.  Spoon into liners to about 2/3 full and bake for 25 minutes.

Vanilla Butter cream

2 cups icing sugar
1 tbs butter
1/4 tsp vanilla extract
1 tbs milk

Sift icing sugar and add butter and mix into the sugar.  Add vanilla and milk, a little at a time, mixing until combined.  With electric beaters, beat until combined and fluffy.  The texture should be light but stiff enough to pipe or spread onto the cooled cakes - if you feel the mixture is too tight, add a little more milk and beat further, if it is too runny, sift in more icing sugar.  You can also add a few drops of food colouring to tint it if desired.

Until next time...

Kitty xx

Saturday, May 5, 2012

A New(ish) Season

Autumn is a lovely time of year here in Queensland.  Along with spring, it is my favourite season.  Autumn is when the weather is just starting to cool down as it comes into winter, and my tummy always craves things that are warm and satisfying.  Come to think of it, when does it not crave anything!


I bought some beautiful new season apples at the supermarket yesterday.  I love how they look in the bowl just as they are as a still life. 

Of course now my mind starts to race at what I could do with them.  I love the smell of apples stewing.  All that lovely aroma, laced with clove, cinnamon and nutmeg.  It is comforting and enveloping like a warm hug.  Especially on a cold rainy day. 


Stewed fruits are delicious hot or cold.  With ice cream, cream, custard or alone.  Apple is particularly nice mixed into yoghurt or muesli or on my new found favourite - Latkes (with a hearty dollop of sour cream).

Apple and Rhubarb would have to be one of my all time favourite stewed fruit combos.To stew the fruit it's basically thus: 

Cut a few ribs of rhubarb and 2 or three peeled and cored apples into chunks.  Place into a saucepan with a few tablespoons of sugar and 1/2 tsp vanilla extract (You can also add cinnamon/cloves etc here to taste).  Bring to a gentle simmer.  The fruit will yield some moisture, so you will not need to add water, but if you wish you can add a little splash of water to help the cooking process along.  If you are trying to cut down on your sugar intake, add a little apple juice in lieu of some of the sugar.  Cook for about 10 mins.  Once the fruit is fork tender, remove from the heat and clamp on a lid.  Use as desired. 

On a side note, if you are using young rhubarb it should be nice and tender.  If it is older it may be a little stringy so just run a potato peeler along the stalks to remove some of the strings.

My Dad makes a really great apple pie.  I always love his baking.  I have tried to get some recipes from him, but his recipes are more like 'a bit of this, bit of that, bung it in the oven' kind of thing.  Somehow what he does seems to work - I guess I get my baking courageousness from him.  Even if he isn't as experimental as I am with flavours and textures it is nice to know that he has had some influence!

Maybe when I'm done admiring my beautiful bowl of apples I will just eat them as is, cut them into wedges and spread them with Nutella (yum!) or bake them into a pie.  If I go out and talk nicely to my rhubarb plant there may even be a whiff of that too.

Until next time...

Kitty xx

Saturday, March 17, 2012

Rainy Days and Cookies


I think I live in Queensland's rain capital.  Northern Queensland would like to say that it has the state's greatest rainfall, but I believe where I live on the Sunshine Coast trumps what falls out of the sky up North. 

It is Saturday and I had so many plans for the weekend.  It is early Autumn and I have been re-acquainting myself with my garden again, after a summer of neglect, making myself busy moving around the garden furniture, mulching my fruit trees and adding a few pops of colour with some potted flowers.  For the afternoons after work where I have had the opportunity to be outside, I have been enjoying pottering about and loving my space again.

And then the rain came tumbling down...

Well it has been raining for weeks, with a day of respite here and there, well enough to get the sheets almost dry or make you wish you hadn't washed at all. 

Good weather for baking!  Which is exactly what I did today.  I baked and I watched the rain fall outside and it was lovely.  As much as I enjoyed myself, it is now evening and the rain is still heavily falling, tomorrow is Sunday and I think I may develop morbid obesity if this weather keeps up, plus a scorching case of cabin fever.


Chewy Chocolate Cheesecake Cookies (Recipe from Real Living Magazine, March 2012)

180g dark chocolate
140g butter
1 1/2 cups brown sugar, firmly packed
2 eggs whisked
1 tsp vanilla extract
1/2 cup cocoa powder
1 1/2 cups plain flour
pinch salt

140g cream cheese @ room temperature
1/2 cup icing sugar, sifted

Preheat oven to 180C.  Line two baking trays with baking paper.

Place chocolate, butter and sugar into a saucepan over low heat, stirring regularly until chocolate and butter have melted.  Remove the pan from heat and add vanilla and eggs.  Stir to combine, making sure the eggs are well mixed into the chocolate mixture to ensure they do not scramble.  Sift in cocoa, flour and salt and mix well to combine.

Place dough in the fridge for about 10 mins, this will firm it up a little and make it easier to work with.

In a separate bowl, place cream cheese and icing sugar and mix with a hand held mixer or by hand until smooth.

Remove dough from fridge and roll tblsps of dough into balls.  Place on lined trays, ensuring you leave space for spreading (I put about 8 per tray but this will depend on the size of your tray).  Make an indent in each cookie with your thumb and fill centre with a dollop (about a teaspoon) of the cream cheese mixture.

Bake for 30 minutes, or until you notice the cookies are cracked on the outside but soft in the centre.  Swap trays after 15 minutes.  Remove from oven and cool on a wire rack.

The cookies should keep for about 5 days in an airtight container if they don't get eaten beforehand!  Makes approximately 24.


I will say this, I did manage to get up very early this morning and go for a jog before it started raining, so I believe eating one or two cookies on a rainy day like today is perfectly acceptable.  (That's my story and I am sticking to it!)

Until next time...

Kitty xx

Wednesday, February 2, 2011

Summer Picnic / Anytime Picnic

I don't know what it is about picnics, but they make me feel so nostalgic.  I love filling up my wicker basket and going off on a local adventure.  I recently bought an old Thermos Flask from my local Op Shop.  It is old and its green and I love the Retro feel I get even just by looking at it.  (I just want to tie on a silk scarf, jump into my Karmann Ghia and drive up the coast!)


I guess when it comes to things like picnics, tea parties or just tea for me I can't help but be a bit of a fuddy duddy.  I love using all my silly little nick knacks and accouterments - serving on pretty plates and drinking out of pretty cups, sitting on a tartan rug with a cosy blanket on hand just in case it might rain...


It is fun.  I think it is the food stylist in me (or 1950's housewife) just begging to get out.  If you are going to eat, entertain, or just enjoy time on your own, why not let it be a chic or luxe event? 


My picnic was down by the beach, Rainbow Beach in fact.  The weather was a little inclement, so I was sure to pack accordingly.  The food was simple - a cold platter of deli meats and cheese, olives, artichokes, sun dried tomatoes and a fresh sourdough Vienna loaf.  I had some left over apple tea cake which went down really well with my thermos of coffee (I was so glad that after 5 hours my coffee was still hot!  $3 well invested!).


It was a beautiful day, despite the weather, and I was able to even get down to the beach to play in the sand for a little while.


Too soon it was time to go home.  But I know there will be other Sundays...


Until next time...

Kitty xx
Friday, December 24, 2010

Oh Hark! Cheesey Goodness!


I love to eat.  Possibly as much, if not more than I love to cook.  I discovered my Holy Grail of cheesey goodness the other night at a Christmas Party - Baked Cheese Cobb.  Wow!  This dish blew my mind.  I have never been so happy to be invited to a party!  I could not stop myself eating it!

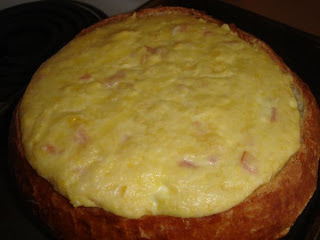
So let me give you the background.  I was at a friends Christmas Street Party and my their  Nanna made a baked cheese cobb.  I watched in awe as it was presented (in my mind ceremoniously) and placed upon the table, all bubbly and golden with a lovely cheesey crust that was just begging to be broken into with a crisp crouton.  I think the last time I saw a cobb dip was when I was flicking through Mum's old dog-eared copy of the Women's Weekly cookbook, which I am sure was from the 70's. 


Upon tasting, I had no words, I could not speak!  It was ooey, it was gooey, it was stringy and reminiscent of fondue.  Wow!  (again!)  I wanted to abscond with it immediately to a quiet corner with a spoon and gorge myself stupid on it! 

At first I was very encouraging of those who would dip crackers into the cobb and how they shared my sentiment of how wonderful it tasted.  However as it quickly began to disappear I would shoot flinty glares at whoever approached...  I wanted it all to myself - and I had to get the recipe.

Nanna Galwey was very delighted to share the recipe - something I thought was going to be a close guarded family secret, handed down through the generations, but a friend told me she saw it featured in a recent women's magazine, which doesn't sound as nostalgic, but you can't have everything!

I am more than happy to share this wonderful recipe with you here, just as Nanna Galwey was happy to share it with me.  Bear in mind it was given to me in cook's shorthand, but it is so simple it virtually makes itself.  I made it for the first time myself yesterday for our own Christmas Street Party, and I am sure if you make it you will get the kudos I enjoyed as well.

Nanna Galwey's Cheese Cobb

2 cups of grated tasty cheese
1 cup sour cream
1 pk Philadelphia cream cheese, at room temperature
3-4 rashers bacon, chopped
1 can creamed corn
1 cobb loaf, centre hollowed out (reserve for croutons)

Be sure to select a nice crusty loaf that will hold up to being filled. 


Cut around the top of the cobb and scoop out the middle of the loaf, being careful not to cut away at the sides.  Reserve this bread to make croutons.  Take all remaining ingredients and mix together.


Spoon mixture into your hollowed out cobb.  (Inquisitive dog optional).  Bake in oven at 170c (160c fan forced) for 45 mins.  Serve with crackers or croutons.

To make the croutons, simply slice reserved bread into bite sized chunks or slices.  Arrange on an oven tray, spray lightly with oil and place in oven to dry out for approx 15-20 mins.  You can easily do this while you have your cobb cooking, just be sure not to forget about them!  (You can toss the bread in olive oil, garlic and herbs if you wish, but it is nice to let the cobb do the talking).

I am sure with a little experimentation the possibilities are endless with this recipe.  I am sure it would be nice with a mixture of Gruyere and Emmenthal, some spinach and artichoke, even used as a sauce over cauliflower and broccoli... I am feeling a kitsch 70's fondue vibe here...

Until next time...

Kitty xx

Saturday, September 18, 2010

Sunday Breakfast - Pancakes


I love pancakes, but they can be one of those 'hit and miss' recipes for me.  I think the Gods have to be smiling on me, or the planets need to be aligned for them to be 'just right'.  Whenever I make them, I know I will end up with either a light, fluffy pancake or a thick, dense, cakey one.  I guess I need more practice.

No matter what I end up making, they still taste good.  What I like is that pancakes can be made in next to no time - while in your pajamas!  Sunday is a great day for pancakes because I always have time for breakfast (I am so naughty during the week - I never eat breakfast!).  So I like to make them special and treat myself by serving them will all sorts of good things...

Pancakes - My simple (evolving) recipe
1 cup plain flour
pinch salt
1tbs sugar
1tsp baking powder
1 cup milk
1 egg

Put dry ingredients into a bowl.  Add milk and egg and whisk to combine and break up the lumps.  The batter should be about the consistency of pouring cream (or just a tad thicker).  Let the batter sit for 30 mins (or even overnight in the fridge if possible).

Grease a non-stick frypan with a little butter (I like to wipe it with paper towel to remove any excess that may burn in the pan) and have your pan moderately hot.  Ladle in about 1/4 cup of batter and swirl your pan to spread it out to your desired size/shape/thickness.  Watch the surface of your pancake, when the bubbles rise to the surface of the batter, it is ready to flip.  Cook on the flip side for about a minute.  (You will get a feel for how long they need to cook for).


I love my pancakes with fruit, so here are two of my favourite sweet additions. 

Berry Compote
This is so simple.  Take a few berries - here I have used strawberries, frozen raspberries and frozen blueberries and put into a bowl. 


Sprinkle over 1 tbs of sugar and a few drops of vanilla extract.  Place bowl in microwave and cook for 1-2 minutes.  The berries will collapse and release their juices and the sugar sweetens the syrup.  The longer you cook the syrup the more it will reduce and the pectin in the fruit will help create a 'jam' like consistency. 


Caramel-Maple Bananas
Heat a non-stick frypan and add 1 tbs of butter.  Add 1 sliced banana and cook until the banana takes on a little colour and softens slightly.  Add 1 tbs of Maple Syrup.  The syrup will mix with the butter to caramelise and to give the bananas a lovely glaze.


Either of the above accompaniments go equally well with French Toast or Waffles.  Or even on top of ice-cream...


Enjoy and Happy Sunday!

Until next time...

Kitty xx

Friday, September 10, 2010

Mushrooms/Fungi/Funghi etc


I love mushrooms.  Especially sauteed in butter and garlic with a little chopped parsley, heaped high on a piece of toasted cibatta.  Yum!  Now that's breakfast!  There are so many varieties of mushrooms and fungi - so many I don't even think I will even try to name them.  One variety I have just become newly acquainted with and can't get enough of are Porcini mushrooms.  (Yes I know I bagged the hype previously - I stand corrected!)
 

I was lucky enough to be able to 'trade' some dried porcini's for a bag of risoni, with an Italian lady from where I work.  I ended up with 20g which roughly equates to about $4 worth, so I have been using them sparingly and with great love and care.  The flavour from these mushrooms is just incredible.  They have given new life to a once bland mushroom risotto, my veal ragu is alive with flavour and my bolognese sauce now has a little extra 'sumpin' sumpin''.

I am going to be so sad when I run out.  I need to find out Anna's source... I need more of the 'good stuff'! 

By the way, if anyone has some black or white truffle that they wish to trade for fresh pasta let me know.  I am dying to believe the hype.

In the meantime, I urge you to go and try some of the many different varieties of mushrooms available.  You will discover new flavours and textures and I guarantee you will find it really hard to go back to just buying button mushrooms again.


Mixed Mushroom Ragu

300-500g of mixed mushrooms (enoki, oyster, portobello and button for example)
a good knob of butter
a few sprigs of fresh thyme
1 clove garlic, sliced finely
salt and pepper to taste
Olive Oil
Parmesan Cheese

Clean any residual dirt off the mushroom caps by brushing them lightly.  Do not wash!  Cut larger mushrooms into smaller chunks or slice.  Quarter button mushrooms and cut the ends off the stems of the enoki.  Heat butter in a frypan and add thyme and garlic.  Add your mushrooms (hold back the more delicate oyster and enoki as they cook very quickly) and be sure they get a good coating of butter.  They will collapse very quickly.  Turn down the heat and add the oyster and enoki mushrooms.  Season to taste with salt and pepper.

Serve on toasted cibatta or with pasta with a good drizzle of olive oil and grated parmesan.

Until next time...

Kitty xx

Wednesday, August 25, 2010

Toad in the Hole


Toad in the hole would have to be one of my all time favourite cheap eats for breakfast.  It is simple - a slice of bread, with a hole cut in the middle, fried in butter and a little olive oil.  Crack an egg into the hole, fry and sprinkle with salt, pepper and a dash of Tabasco.  I love the crispy buttery goodness the bread takes on from cooking it in butter and oil in a frypan... 

This breakfast is also a fond food memory of my childhood.  I remember my Mum and Dad making them for me as a kid and I always found it funny that the egg was called a 'Toad'.  To this day I still don't really know why, other than the fact that it is 'something' in a hole.  Why not call it a rabbit? or a mole?  With my addition of Tabasco, I am re-naming mine:

Fire in the Hole!

1-2 slices bread (pref rye or sourdough)
1-2 eggs (pref organic, cage free)
smidgen of butter and olive oil
salt, pepper and Tabasco sauce

Cut a hole in the middle of your slice of bread - freestyle it or use a small glass or cookie cutter.  Heat your butter and oil in a non-stick frypan.  Slide your bread into the pan and coat both sides with the oil and butter.  (Fry your 'hole' as well - no need to throw it away).


Crack your egg into the 'hole' and fry to your liking.  (If you like your egg runny, you may want to flip your bread to toast both sides before cracking in your egg).  Season to taste.

For my money it is a great breakfast for the weekend - especially when the pantry is looking a little scant and you wake up feeling like you ate a box of kitty litter.  With all the fast food establishments offering breakfast these days, it is a cheaper, home cooked alternative.  As for healthy, everything is OK in moderation.  I just have to resist the temptation to make 2 as a sandwich filled with bacon, lettuce and tomato... The possibilities are endless...

Until next time...

Kitty xx

Saturday, July 31, 2010

Fajitas can be made from your pantry, not just a packet.


I used to really love a brand of 'make at home' Mexican food, available from the supermarket.  Without naming the brand directly, Marty Robbins sings about falling 'in love with a Mexican girl' in this 'Old' town... Get my drift?

Anyway because I have this weird aversion to preservatives and ingredients labelled with numbers I always try to find a way to make my own versions of the store-bought ones.  I usually find that the ones I make taste better.  The best part is that the ingredients are really simple - they use basic spices most people use often or have lurking in the back of their pantry anway.

I love Fajitas and these ones taste really light and are full of flavour.  I even lighten them up a little by using European yoghurt in place of sour cream.  They go really well with the corn salsa as well.  Enjoy!

Fajitas - Recipe inspired by Jamie Oliver - Jamie's Ministry of Food

1 tsp smoked paprika (or sweet paprika if you can't find smoked)
1/2 tsp ground cumin
1/2 tsp chili powder (or more or less to taste)
pinch cayenne pepper (or more if you like it 'muy caliente!')
Olive oil
1 lime
1/2 red pepper, sliced into strips
1/2 green pepper, sliced into strips
1 medium red onion, cut into thin wedges
1 or 2 skinless boneless chicken fillets, sliced thinly
8 flour tortillas
small tub of European yoghurt

For the Corn Salsa
1 can corn kernels, drained and rinsed (or 1 cob fresh corn, nibblets cut off cob)
1/2 red onion, finely diced
pinch dried chili flakes
1 small Lebanese cucumber, peeled and de-seeded
1 avocado, peeled and diced
juice of 1/2 a lime
1 bunch chopped fresh coriander (cilantro)

Mix paprika, cumin, chili and cayenne together in a bowl.  Add enough oil to make into a runny paste (about 2 tbs should loosen it up enough).  Put chicken fillet slices into a bowl and pour over spice paste.  Mix thoroughly to coat well.  Put your frypan on high heat *do not add oil to the pan* add your chicken and cook for 5-6 minutes, until the chicken is cooked through.  Add peppers and onion and turn along with the chicken, until the vegetables soften slightly.  Turn the heat off and squeeze in the juice of 1/2 a lime.  Mix well and season to taste.  (The lime juice gives the chicken a nice twang and mixes with the juices to make a nice thick gravy).

For the Corn Salsa - Heat a frypan with 1 tbs olive oil.  Add corn, onion and chili and cook until onion is softened (about 5 mins).  Remove from heat and allow to cool for about 5 mins.  Add the juice of half a lime, along with the cucumber, avocado and chopped coriander.  Mix to combine. *This salsa, mixed with grated cheese makes a great filling for Quesadillas too.

Warm tortillas in a microwave oven or a warm dry pan.  Serve Fajitas with yoghurt and salsa.

Ole!

Until next time...

Kitty xx