Showing posts with label Italian Inspired. Show all posts

Monday, October 3, 2011

Love for Love Apples


Even though I ran away to New York for the summer, I came home to a good yield of my home grown Heirloom tomatoes.  I have to admit, I didn't have so much luck with the larger Beefsteak and Moneymaker varieties, but the small cherry and plum tomatoes proved to be more successful, abundant and less prone to their skins splitting.  (If anyone knows what causes this, I would love to know).

I have planted out some Roma tomatoes which will hopefully give me a crop for early Summer so this is something to look forward to!

I just finished reading a lovely book, 'A Homemade Life' by Molly Wizenberg.  Anyone who likes food, or likes to eat should read this memoir.  I won't give the story away, I happened upon it through a recommendation in my Amazon.com list so purchased it blindly without knowing anything about the story and I must say, loved it.

What made me mention the book in this blog entry is because Molly includes a recipe for Tomato and Fennel soup.  I had never cooked a fennel bulb before in my life until a few nights ago when I decided to make this soup, so I approached it with a little trepidation.  My father is not a fan of fennel, in fact he is very vocal about how much he dislikes it!  Needless to say, he was in the back of my mind whilst making it.  The flavour is mild and not at all over powering of aniseed like I was expecting.  (Ha Dad!)  Overall I thoroughly enjoyed it and will certainly make it again.  The soup is good for a cool wintry night.  It is very hearty.  The tomato, onion and fennel are chunky, so be sure to have a hunk of good sourdough, or grilled cheese alongside for dunking (or a hunk to eat it with, I mean, what's better on a cold night?)


I was in a celebratory mood for no particular reason, (maybe a tomato high?  Who knows?) so made Insalata Caprese for a starter - Just because.  Even though I am a little lactose intolerant, what harm could a little fresh mozzarella do?  (Don't ask!)

Tomato Soup with Two Fennels - Molly Wizenberg, A Homemade Life

In this recipe, Molly uses 2 medium fennel bulbs, 4 cloves of garlic and 2 teaspoons of fennel seeds.  I tweaked it as I was a little scared of these amounts but if you would like to stay true to her recipe, go by those quantities, otherwise go with mine.

1 tbs olive oil
1 medium brown onion, thinly sliced
1 medium fennel bulb, trimmed and thinly sliced
1 clove garlic, finely chopped
1 tsp fresh thyme leaves
1 tsp fennel seeds
2 cans whole peeled tomatoes
Salt and pepper to taste
pinch of sugar (to cut the acidity of the tomatoes)

In a large saucepan or Dutch oven, warm oil.  Add onion and fennel and cook until the onion begins to soften.  Add garlic and cook, being careful that it doesn't burn for about 5 minutes over a medium heat.  Add thyme and fennel seeds and cook for around 2 minutes or until fragrant.  Add tomatoes, and crush them with the back of a wooden spoon (or alternatively a potato masher).  Add a cans worth of water and bring the soup to the boil.  Bring down the heat to a gentle simmer and cook uncovered for about 45 minutes.  If it seems a little thick, add more water.

You will know the soup is cooked when the fennel is nice and tender.  Season to taste. Adding a pinch of sugar will cut the acidity and add a nice sweetness.  Molly says to add a splash of red wine vinegar if the soup tastes a little bland, but I didn't find this necessary.

Remember this dish is more like a vegetarian stew, rather than a soup and makes enough to serve four. 


Insalata Caprese - by Me and a bazillion Italian Nonna's who I wish were mine :)

2 large, vine ripened tomatoes (at room temperature)
1 tub baby bocconcini cheese or 1 large ball of Buffalo Mozzarella
Olive Oil
Balsamic vinegar (this time I used white balsamic)
A small handful of fresh basil leaves
Salt and pepper

Slice tomatoes and cheese into thick rounds and arrange on your serving platter of choice.  Season liberally with salt and pepper (the tomatoes especially) and anoint with a good slug of good olive oil.  Add balsamic vinegar (I pour into a teaspoon and add it this way, so I have more control, otherwise it tends to just flow out of the bottle and everywhere you don't want it).  Scatter with basil leaves.  I like to let this salad sit for about 15 minutes before eating so that all the ingredients are at room temperature and soak up all the delicious oil and vinegar.  Serve with a nice crusty bread (or hunk as discussed previously)...


Do check out 'A Homemade Life'.  I know you will enjoy it as much as I did.  Come over for a cup of tea and a slice of cake and you can borrow it from me if you like :)

Until next time...

Kitty xx

Wednesday, May 11, 2011

Eggplant Parmigiana


Eggplant is a vegetable which I have fallen for hard the past few years.  However I would treat it with much restraint, using it only for stock standard Eggplant recipes such as Baba Ghanoush.  This was until a friend introduced me to the delicacy that is deep fried, crumbed eggplant.  Done right, you get a wonderful crisp crumb, and a lovely creamy middle which is snacking bliss!

To make this joyous snack into a delicious meal, I combine layers of crumbed shallow fried eggplant with lots of mozzarella cheese, my home made sugo, bake it for half and hour and voila! - Eggplant Parmigiana. 

It is so simple I hardly need to give you a recipe, but I will just so you can add it to your repertoire.


Parmigiana di Melanzane (Recipe by Rosa Matto from the book 'Italian Food Safari')

3 large eggplants
salt
plain flour
4 eggs, beaten
1-2 cups dry breadcrumbs (I add this step to the recipe as I like to crumb my eggplant.  If you are avoiding too much wheat, you can omit the crumb).
Olive Oil

Sugo
80ml olive oil
1 onion, finely chopped
1 garlic clove, chopped
750ml Passatta (or 2 tins Italian tomatoes)
salt and pepper
1/2 bunch basil leaves

250g bocconcini or fresh mozzarella, sliced
100g Parmesan, grated

Slice the eggplant no thicker than 1cm.  Sprinkle the slices with salt.  Stack in a colander and weigh down with a heavy object.  Leave for 1 hour.  This step is really important as you want to get as much moisture out of the eggplant.  The salt will help draw out the moisture, along with any bitterness that the eggplant may have. 

Pat the slices dry and lightly coat in seasoned flour.  Dip into the beaten egg and then into your breadcrumbs.  (If you are not using breadcrumbs, leave out this step and just dip in the egg).  Shake off the excess and fry in hot oil until golden brown on each side.  Drain well on paper towel.

To make the sugo, heat the oil and fry the onion and garlic until soft.  Add tomato and bring to the boil.  Cook until slightly reduced.  Season to taste and add half of the basil.

Preheat oven to 180c.  Smear the bottom of a baking dish with sugo and add a layer of eggplant.  Dot with slices of bocconcini, a sprinkle of Parmesan and a few basil leaves.  Keep layering until you have used up all the eggplant.  Finish with a layer of sugo, and top with more cheese.


Bake for around 30 minutes, until the top is golden.  When cooked, allow to rest for 10 minutes before serving.

This dish is delicious with zucchini sauteed in olive oil and thinly sliced garlic, or steamed vegetables or if you are being really good, a nice green salad.  It is a great vegetarian alternative to meat lasagna.  I have served this to die-hard carnivores and no one has ever asked 'Where's the beef?'

Until next time...

Kitty xx

Friday, September 10, 2010

Mushrooms/Fungi/Funghi etc


I love mushrooms.  Especially sauteed in butter and garlic with a little chopped parsley, heaped high on a piece of toasted cibatta.  Yum!  Now that's breakfast!  There are so many varieties of mushrooms and fungi - so many I don't even think I will even try to name them.  One variety I have just become newly acquainted with and can't get enough of are Porcini mushrooms.  (Yes I know I bagged the hype previously - I stand corrected!)
 

I was lucky enough to be able to 'trade' some dried porcini's for a bag of risoni, with an Italian lady from where I work.  I ended up with 20g which roughly equates to about $4 worth, so I have been using them sparingly and with great love and care.  The flavour from these mushrooms is just incredible.  They have given new life to a once bland mushroom risotto, my veal ragu is alive with flavour and my bolognese sauce now has a little extra 'sumpin' sumpin''.

I am going to be so sad when I run out.  I need to find out Anna's source... I need more of the 'good stuff'! 

By the way, if anyone has some black or white truffle that they wish to trade for fresh pasta let me know.  I am dying to believe the hype.

In the meantime, I urge you to go and try some of the many different varieties of mushrooms available.  You will discover new flavours and textures and I guarantee you will find it really hard to go back to just buying button mushrooms again.


Mixed Mushroom Ragu

300-500g of mixed mushrooms (enoki, oyster, portobello and button for example)
a good knob of butter
a few sprigs of fresh thyme
1 clove garlic, sliced finely
salt and pepper to taste
Olive Oil
Parmesan Cheese

Clean any residual dirt off the mushroom caps by brushing them lightly.  Do not wash!  Cut larger mushrooms into smaller chunks or slice.  Quarter button mushrooms and cut the ends off the stems of the enoki.  Heat butter in a frypan and add thyme and garlic.  Add your mushrooms (hold back the more delicate oyster and enoki as they cook very quickly) and be sure they get a good coating of butter.  They will collapse very quickly.  Turn down the heat and add the oyster and enoki mushrooms.  Season to taste with salt and pepper.

Serve on toasted cibatta or with pasta with a good drizzle of olive oil and grated parmesan.

Until next time...

Kitty xx

Saturday, July 31, 2010

I've never been to an Italian Wedding but I made one...

The weather is still cold and wintry, which means the soup pot is a permanent fixture on the hob until the weather warms up.  This also means that at the farmers market there are the most amazing winter vegetables available.  White turnips, purple turnips, parsnips, cauliflowers... all these wonderful veg for roasting and making thick and satisfying soups.  Oh so tempting!

Last week I bought some Kale and Cavolo Nero.  For those unfamiliar with these veg, they are related to the cabbage family.  Cavolo Nero is also known as 'Italian Cabbage', though it looks and feels more like a tougher, leathery form of silver beet.  Kale on the other hand looks more like a thick, plasticky lettuce.  (For any Americans, Kale is closely related to what you know of as 'Collard Greens').


Both are very high in vitamins and have a deliciously earthy flavour when cooked.  My mission was to use these two ingredients in soups.  I ended up making two soups, Italian Wedding, in which I used kale in place of escarole (endive) and a Minestrone, where I used the Cavolo Nero in place of spinach.


Out of the two soups I made, I have to say that the Italian Wedding was my favourite, I think because of the meat balls which, in a soup are a satisfying and surprising addition.  The Kale gave it a nice earthy flavour.  It made it taste 'healthy' if that makes any sense! 

Here is my version of Italian Wedding Soup


Italian Wedding Soup

400g minced beef or pork
1/4 tsp onion powder (or a little grated onion, I find onion powder just easier)
1/4 tsp dried oregano
1/4 tsp chili flakes
Pinch salt
1/4 cup breadcrumbs
1 egg
8 cups chicken stock
1 carrot, chopped
2 sticks celery, chopped
1 clove garlic, chopped
1 onion, chopped
1/2 cup risoni or orzo
Small bunch Kale/Cavolo Nero/Spinach/Endive, chopped
Olive Oil
Grated Parmesan

To the mince, add onion powder, oregano, chili, salt, breadcrumbs and egg.  With clean hands (or a wooden spoon) mix well together to combine.  Using wet hands, form into small meatballs and set aside in the refrigerator for about 30 mins. 


In a saucepan, heat 1 tbs olive oil and add carrot, celery, garlic and onion and fry for about 3-5 mins or until onion is translucent.  Add chicken stock and bring to a simmer.  Add risoni or orzo.  Heat a frypan and add 1tbs olive oil.  Add meatballs and fry until golden all over.  Add browned meatballs to the stock mixture.  Bring to a simmer and add your chosen greens.  Simmer until greens wilt slightly.  Season to taste and sprinkle some grated Parmesan cheese over the top.

Serves 4.


So there you have it.  I had an exciting weekend fossicking at the markets for some new veg (for me finding new greens is exciting!) and used them in a nice new hearty soup, which I am sure is going to become part of my Winter repertoire.

Until next time...

Kitty xx

Monday, July 19, 2010

Dulce Dulce Dulce!

Dulce = sweet in Italian.  Sweet things are not really what one should eat at lunchtime, but I like to make exceptions to the rule.  Plus, I didn't expect an experiment to turn into my lunch!

I think Winter is making me want all things naughty, nice and deep fried. 

I had some leftover ricotta cheese in my refrigerator, about half a tub.  Originally it was to make cannelloni or ravioli, but I used it to make the honeyed ricotta for my french toast. (See previous blog entry).  I was stumped as to what to do with this left over cheese...  

Ricotta Doughnuts sprung to mind.  I had never made them before and had no recipe so I did a little Internet searching.  There are many recipes out there for these doughnuts - but not so many for such a meagre amount of cheese.  I had to do much converting and a little experimenting - Here is the version I came up with.

Ricotta Doughnuts - Makes about a dozen small doughnuts 

125g ricotta cheese
30g castor sugar
2 small eggs (or 1 XL egg)
85g plain flour
1/4 tsp baking powder
1/4 tsp vanilla extract
Oil for deep frying
Few tsp castor sugar mixed with 1/2 tsp ground cinnamon

Heat oil in a small saucepan (about 2 inches of oil in pan).  Mix cheese, sugar, eggs and vanilla together.  Sift in flour and baking powder.  Fold to make a smooth batter. 


Drop teaspoons full of batter into the hot oil.  Do not overcrowd the pan.  The doughnuts will initially sink to the bottom, then puff up slightly and rise to the top.  Turn and cook until golden. 


Remove from oil and roll in cinnamon and sugar.  Eat while hot!


This recipe easily makes enough doughnuts to satisfy a sweet craving for two people.  If dining solo, you can keep any left over batter in the fridge to make more later.

With a little further experimentation, I am sure this recipe would respond well to tweaks - like adding orange zest to the batter, or a chocolate or caramel dipping sauce to accompany... You are only limited to your own taste and imagination!

Until next time...

Kitty xx

Wednesday, June 30, 2010

First time Biscotti

I love biscotti.  Especially when they are so hard you have to gnaw on them with your back teeth to break them apart.  They're like teething rusks for grown ups!  Today was a great afternoon for baking and I wanted to shake up my cake/muffin/cupcake routine by making something different.  

Today was my first time at baking biscotti.  I think the whole 'twice bake' part of the procedure and my own impatience with baking in the past has been the stumbling block.   

Now the process was not without drama. Initially, I was thinking, how hard can it be?  I had all the ingredients and a basic recipe, but what I discovered along the way was that I lacked 'technique'.  I had a little trouble when it came to slicing the logs into biscuits, I found that they crumbled as I cut them.  I am not sure if it was because the logs didn't cool long enough before cutting, or if I had too many nuts in my mixture. 

Here is the recipe (with Kitty flavour) and my biscotti journey.  Despite my hang-ups, they taste great, even if they don't all look perfect!

Pistachio and Almond Biscotti - Inspired by Tyler Florence

3/4 cup pistachio nuts
3/4 cup almonds (or 1 1/2 cups of whatever nuts you fancy)
115g unsalted butter
3 eggs
1 cup castor sugar
1 tsp vanilla extract (Remember what Ina Garten says...)
3 1/2 cups plain flour
1 tsp baking powder
1/2 tsp salt

Preheat oven to 180c.  Lay nuts out evenly on a baking sheet and bake for 10 minutes to toast them slightly.  Remove from the oven and set aside to cool.


Cream butter and sugar until light and fluffy.  Add eggs, one at a time, beating well after each addition.  Add vanilla and beat well. 


Sift in flour, salt and baking powder.  Using a wooden spoon, attempt to mix.  Mix until you develop a sore mixing arm.  Work through the pain and keep mixing until the mixture eventually comes together to form a dough. 

Add nuts and again, I challenge you to incorporate them into the mixture without feeling like your arm is going to fall off.  (Or do what I did, which was give up and poke the nuts back into the mixture and shape the dough into a shaggy lump).

Lightly flour your work surface and divide your dough into 3.  (3 seemed most manageable for me, 4 might work better next time).  Shape dough into logs about 1 inch high, and transfer to your baking sheet, lined with parchment paper.


Bake for approx 35 minutes, making sure the bottoms don't get too brown.  Remove from the oven and allow to cool for 5 minutes.  (When I removed my logs from the oven, they cracked which made me a little concerned but I soldiered on...)


When cooled, place on a cutting board and cut logs on the diagonal, about an inch thick.  (Don't be surprised if the nuts cause your biscotti to disintegrate a little - or a lot as I found!  Next time I think I will roughly chop my nuts or add less).


Place your biscotti back onto the baking sheet and return to the oven for 5 minutes, turn over and bake for a further 5 minutes.


Dust with icing sugar to serve and store in an airtight container.


Enjoy with Vin Santo, tea or coffee. 

Cin Cin!

Until next time...

Kitty xx

Saturday, June 19, 2010

Vieni con me!

Come with me out into my little patio garden.  It is amazing what you can grow in a small space if you want to.  I rent so I don't have the luxury of being able to dig up the lawn to make a vegetable patch, though I do yearn for a big kitchen garden.  If I could grow a crop of anything in my backyard, it would be Heirloom tomatoes.  Then I would have a big 'Tomato Day' and make passata.  But I digress.  I improvise by growing a few citrus in large, terracotta pots.  Nestled around the trunks of each tree I have built up my own humble little herb garden.

 I can only dream about growing tomatoes as luscious as these.

 I grow rosemary, thyme, flat leaf (Italian) parsley, sage, sweet and perennial basil, bay and mint.  These are the herbs I use all the time, I don't waste time growing the ones I don't use.  I must confess though, that I really do love the smell of lemon thyme, but I find I never use it.

A few pots is all you need to grow herbs with minimal fuss.

Rosemary has a nice homely aroma which reminds me instantly of roast lamb.  Recently I have discovered that rosemary takes dishes like mushroom barley soup and my 'quattro fagiolo minestra' (four bean soup) to another level. 

Thyme is my favourite herb of all.  My favourite use for it would be scattering sprigs around par boiled wedges of potato tossed in olive oil, garlic cloves and salt. I bake in a hot oven until crisp.  I could eat these potatoes as a meal on their own.  They just  develop a lovely sweetness that makes me want to keep eating them.


Parsley would have to be the most indispensable herb in my garden.  Basil comes a close second.  The two are brilliant together and are fantastic when I feel like pasta but don't feel like making a long, laborious sauce.  Instead, I make my own pesto.  Once you have made your own pesto, it is hard to ever go back to the stuff in jars. 


Pesto alla Genovese

1 clove of garlic (or more or less to taste)
50g pine nuts, toasted
2-3 handfuls of fresh, sweet basil leaves
1/4 cup freshly grated Parmesan (Yes I buy the good stuff now...)
Olive oil (enough to combine your mixture )
Pinch of salt

Add garlic, pine nuts and a pinch of salt to a mortar and pestle and pound.  Add basil and pound again until the leaves resemble a rough paste.  Add a little of the Parmesan.  Gradually add the olive oil until and pound gently until the mixture is combined.  Check seasoning and add more salt and Parmesan to taste if necessary. 

(Alternatively you can use a food processor, but I like making pesto in my mortar and pestle, it just feels more rustic and 'home made'.  Also, I like to add a handful of Italian Parsley to my pesto.  It isn't in the tradition of Genovese Pesto, but I just like the extra green and it helps me out if my basil plants are not yielding enough leaves for the recipe!)

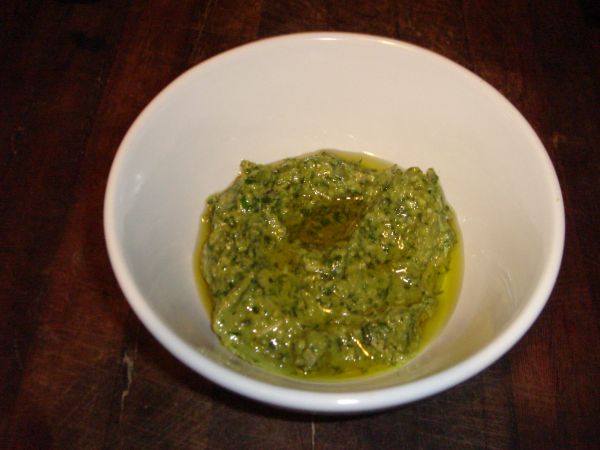
In this Pesto I used Macadamia nuts as I had run out of Pine nuts.  It is OK to improvise!

 
I like to cover my pesto with Olive Oil and use within 3 days, covered and kept in the fridge.

Sage is one of those lovely musky and woody herbs that I adore.  I love crisping leaves up in butter and pine nuts to make a brown butter sauce to top fresh pumpkin ravioli.  It is also sublime on chicken breasts wrapped with pancetta or prosciutto.

My Sage looks a little sad and worse for wear, but it will come back in Spring.

Mint is a wonderful addition to Greek yoghurt and finely chopped cucumber to make a cooling relish to slather over tandoori chicken pieces or dolloped liberally over slices of seared lamb fillet for souvlaki.

I am growing my latest mint plant from some store-bought mint in a vase of water in my kitchen.

Along with my herbs, I have a Kaffir Lime tree.  The leaves are essential for Thai curries and Laksa, which I like to make often.  It is also nice that it is a lovely ingredient that I can share with friends and neighbours.  The leaves are also really good to rub on your hands after shelling prawns or handling fish to get rid of the smell.

The leaves of the Kaffir Lime Tree rather than the fruit are the best to use in recipes.

Fresh home grown herbs may not be available to everyone, but if you have space for a few small pots and a sunny position in your garden (or balcony or window) they are easy to grow with not too much fuss.  They just need a little love.  The results are really satisfying.

Who needs a Scarecrow when Miss Gidget is on duty?

Until next time...

Kitty xx

Thursday, May 6, 2010

You don't have to be Italian to make fresh pasta.

I am going to tell you that you can make your own pasta.

1. I am not Italian (Though I would love to be and if any Italians out there would like to adopt me, please email me @ grrrlywonder@gmail.com

2. You can make your own fresh pasta - today, right now, and have it with your dinner tonight.

I have tweaked a few pasta recipes and have found this one works best for me - it will easily serve 4 people or you can split it to feed 2 for 2 nights. (Just cut the dough in half after resting and be sure to use your left over dough the next day.)

Here are the ingredients:

250g of Strong Italian Flour (regular all-purpose flour will work but I have found the Italian 00 flour to be exceptionally good - it is a little more expensive, but you will thank me for forking out the extra dollar.)

2 whole eggs (size medium/large - if your mixture becomes too gluggy, add more flour to get the right texture - if it is too dry and crumbly you may need to add another egg and a little more flour.)

A decent pinch of salt.

Elbow Grease - Pasta making is a wonderful upper body workout!

Pasta Machine or Rolling pin.

Ready?

Measure out your flour and add a good pinch of salt.  Tip onto a clean (stressing CLEAN here) bench top and kind of make a well in the centre. Make it look like a flour version of a mini volcano. 

Crack your eggs into the well and kind of swirl your hand around to break the eggs up and as you do, work the flour into your mix.  This can get a little tricky if your flour wall gives way and your eggs escape, but because you have meticulously cleaned your bench top, there is no chance of nasties getting into your dough.


Work the flour and eggs until they become a nice ball of dough. Work the dough like you mean it. Be sure to add a light dusting of flour if the mixture is too sticky. You want to be able to roll it without it sticking all over your fingers. Give the dough all of your frustrations, your anger, your lust, whatever it takes to make it nice and smooth and silky and elastic.


Wrap dough in cling film and place in the refrigerator for at least 30 mins to rest. This is an important step because you have given the gluten in the flour a great work out - you want it to relax for a bit before you roll it out. This will prevent the dough from shrinking back.


Now the fun part...

Rolling Pasta Dough

You can use a rolling pin if you don't have a pasta machine. Some of us are lucky to have a pasta machine lurking in the back of our kitchen cupboards. If you do, now is the time to get it out. If you don't - now is the time to get one (just kidding). A rolling pin works just fine - you just need to be diligent with flouring your workspace and rolling your dough to the point where it is not too thick, not too thin.


When using my pasta machine, I like to roll my dough to the thickness of the number 3 setting. I find it is just right for fettuccine and pappardelle. For ravioli, I will run it down to setting 2. Be sure to keep the pasta lightly floured and separate to prevent sticking. If you wish, you can hang your pasta to dry and it will keep for a couple of weeks. A wooden spoon between 2 kitchen chairs in a warm sunny spot of the kitchen works well for me. 


I love home made pappardelle - pasta cut by hand into 3/4 inch strips. It is great to have with a rich, hearty ragu. It is even nice just hot and buttered.

Cooking your pasta


Bring a large pot of water to the boil.(About 6-10 litres - depending on the amount of pasta you wish to cook - a small pot will not do.) Add a good teaspoon of salt - as Nigella Lawson says, the water needs to be 'As salty as the Aegean'.

When the water comes to a rolling boil, add your pasta. I kind of gently shake it in to separate the strands. Be sure to keep an eye on your pasta as it cooks - it will only take a couple of minutes. Be sure to test regularly to make sure it is 'al dente'. It should be nice and soft but firm with a slight bite. Have your colander handy and be sure to drain well.

Enjoy with your favourite sauce.

Buon Appetito!

Until next time...

Kitty x

What would you like to eat?


Nothing gets me more excited than food.  I love thinking about what I am going to make for my next meal.  I get endless inspiration from walking in the supermarket, by visiting Farmers Markets and specialty stores like continental delis and even those annoyingly snooty and pretentious up market 'Providores'.  Cookbooks outnumber novels in my book collection.  I have an international subscription to a food magazine.  I watch endless shows on television about food and cooking.  Whenever I travel, I love to try the native cuisine - even if it means eating a Deep Fried Oreo!

Food is a wonderful thing.  It warms the heart, nourishes the body and soul.  Sharing food is sharing a part of yourself.  I get great pleasure from cooking a meal that I have made with love for the people I love and care about.  That pleasure is doubled when you see the appreciation and enjoyment you have given to others.

I want to share with you some of my favourite things to eat.  Along with some of my favourite food memories.  I am a lover of many different cuisines.  My favourite is Italian (pretty much a given) - even though I am not remotely Italian - maybe my Botticelli-like curves could help me pass...  I love everything about the food and the Italian culture.  Especially that food is such a strong a part of the culture.  

As a kid, I would sometimes go with my Dad on some of his plumbing jobs.  I always loved it when he had to do a job for 'Leo', an Italian man who owned a restaurant.  Going to 'Leo's' always meant I got to eat ravioli bolognese and lemon gelato.  I remember my Dad would often bring home bowls of rigatoni with napoli sauce, or pickled peppers, or bread sticks - there was always a little something sent home from Leo for my little sister and I.  It was great, our family felt like part of his family - we even got invited to parties and passed as Italians!  (Even if the only Italian word my Dad knew was 'Bongiorno') 

Leo gave me lots of inspiration in my formative cooking years and showed me how to make one of the first dishes I learned to cook and still cook today - Spaghetti Boscaiola.

Spaghetti Boscaiola for 2 (or 1/2 now, 1/2 tomorrow)

1 tbs olive oil
125g short cut bacon sliced
1/2 onion, finely chopped
1clove garlic, crushed
150g button mushrooms, sliced
Handful of baby spinach
150ml thickened cream
Chopped fresh parsley
1/2 packet of Spaghetti

Bring a large pot of salted water to the boil, add pasta and cook until 'al dente'.  While the pasta is cooking (for dried pasta this should take between 8-10 minutes), heat oil in a large frying pan. Cook the bacon, onion and garlic, until onions are translucent and bacon is beginning to brown.  This should take about 5 minutes.

Add mushrooms and cook for further 5 minutes.  Add spinach. Turn heat down to low and add spinach.  This will wilt considerably.  Add cream, being careful not to keep the heat low (or even turn it off at this stage), or the sauce will split and the cream will turn into oil . Season well to taste. If the sauce is too thick, you might want to thin it down a little with some cooking water from the pasta.

Add your cooked and drained pasta to pan with sauce, add chopped parsley and toss until well combined.  Scatter over some shaved Parmesan and serve with a nice crusty bread.

Until next time...

Kitty xx